Cloudflare Pages的官方自动化构建仅支持Github/Gitlab仓库。如果仓库在其他位置,就需要自己去构建然后推送。
创建Cloudflare API Token
TOKEN: https://dash.cloudflare.com/profile/api-tokens
赋予"Edit Cloudflare Workers"权限
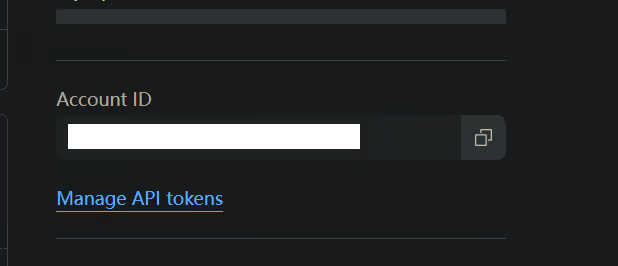
然后转到 Workers & Pages -> Workers & Pages,在右侧栏中可以找到 Account ID
创建密钥仓库
由于API Token是敏感信息,不应在代码仓库中直接存储。
CNB创建新仓库,仓库类型选择密钥,然后创建一个yaml文件,我取得文件名是envs.yml
填入account id和api token
1
2
| CLOUDFLARE_ACCOUNT_ID: xxx
CLOUDFLARE_API_TOKEN: xxx
|

创建CNB自动化构建
React项目示例
1
2
3
4
5
6
7
8
9
10
11
12
13
14
15
16
17
18
19
20
| master:
push:
- runner:
cpus: 2
docker:
image: node:22
volumes:
- /root/.npm:cow
stages:
- name: 依赖安装
script: npm install
- name: 编译
script: CI=false npm run build
- name: push cloudflare pages
image: docker.cnb.cool/hex/cloudflare-wrangler:latest
imports:
- https://cnb.cool/57U-TECH/Keys/-/blob/main/envs.yml
script:
- wrangler pages deploy ./build/ --project-name=main-page --branch master
|
示例:https://cnb.cool/57U-TECH/main-page/-/blob/master/.cnb.yml
Hexo项目示例
1
2
3
4
5
6
7
8
9
10
11
12
13
14
15
16
17
18
19
20
| main:
push:
- runner:
cpus: 2
docker:
image: node:22
volumes:
- /root/.npm:cow
stages:
- name: 依赖安装
script: npm install
- name: 编译
script: CI=false npm run build
- name: push cloudflare pages
image: docker.cnb.cool/hex/cloudflare-wrangler:latest
imports:
- https://cnb.cool/57U-TECH/Keys/-/blob/main/envs.yml
script:
- wrangler pages deploy ./public/ --project-name=blog --branch main
|
大功告成
每次代码push后,CNB将会自动编译并推送到cloudflare pages。
相关镜像
包含Wrangler CLI的镜像
https://cnb.cool/hex/cloudflare-wrangler

 wechat
 alipay